Restaurant Technology
Published March 5, 2026
Step-by-step guide to connect Grubhub's API to your POS: register, verify compatibility, secure credentials, sync menus, test, and launch.

Manually entering Grubhub orders into your POS system wastes time and increases errors. Integrating Grubhub’s API with your POS automates this process, syncing orders, menus, and pricing in real time. This guide outlines how to:
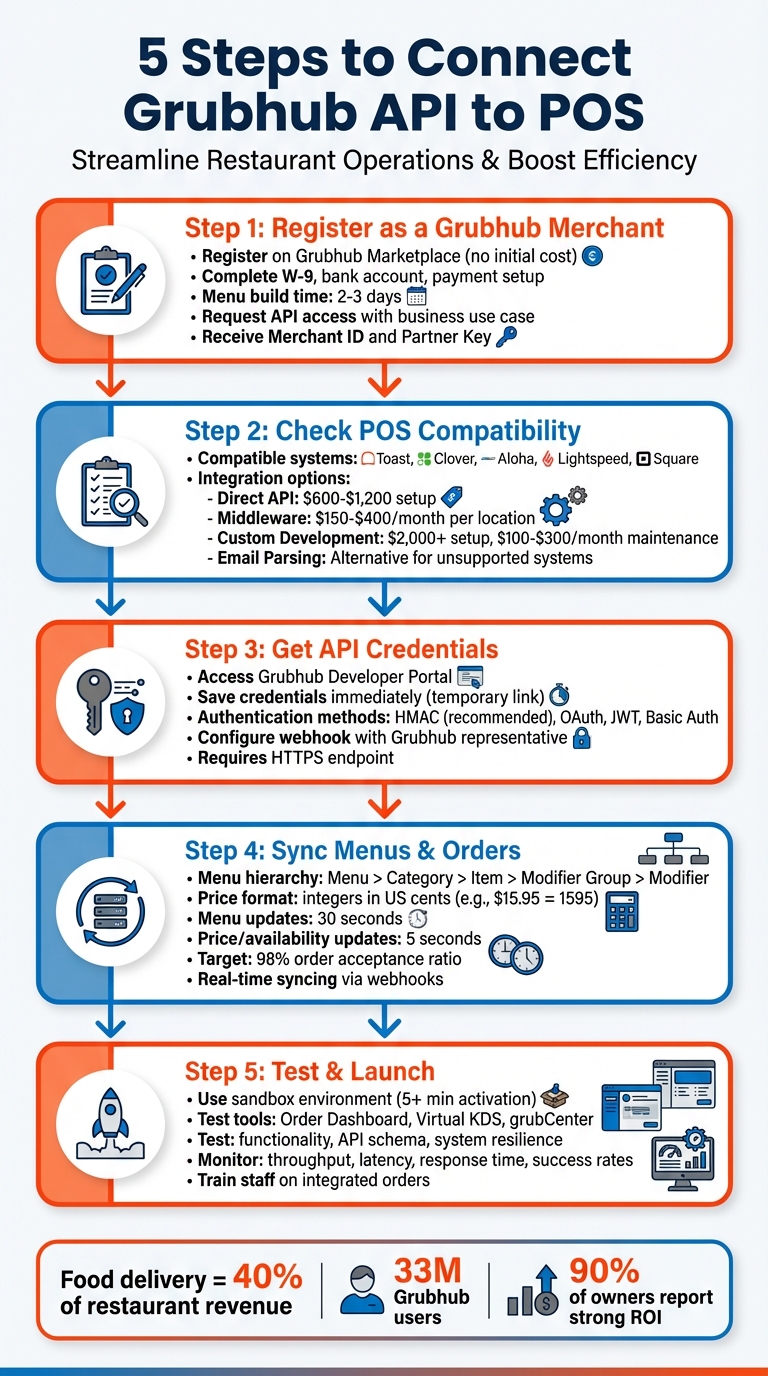
5 Steps to Connect Grubhub API to POS System
To get started, register on the Grubhub Marketplace without any initial costs. You'll need to provide your restaurant's name, menu, and some basic business details. After submitting this information, Grubhub will send you an activation email. This email includes instructions for setting up an Admin password for the "Grubhub for Restaurants" portal.
Once logged in, use the "Get started" checklist to handle the key setup tasks. These include submitting a W-9 form, linking your bank account, setting payment preferences, uploading storefront photos, and confirming your operating hours. Grubhub simplifies the process by building your menu for you, which usually takes 2 to 3 days.
Once your account is active, you're ready to move on to requesting API access for smooth POS integration.
After completing the initial setup, you can request API credentials by submitting a business use case. This should outline why you need API access, such as syncing order data, managing delivery zones, or streamlining real-time order workflows.
In your use case, specify the integration method you plan to use - options include the Marketplace API, Grubhub Connect, or Onboarding API. You’ll also need to provide a secure webhook URL for receiving order notifications. Grubhub will verify your webhook setup through direct contact with a representative. Make sure all onboarding tasks, like payment setup and storefront customization, are completed before requesting live API credentials.
Once approved, take note of your unique Merchant ID and Partner Key (X-GH-PARTNER-KEY). Before going live, use the "Send a test order" feature to confirm your integration is working correctly.
Before diving into Grubhub's API integration, it's essential to confirm whether your POS system supports it. Grubhub works with several major POS providers, including Toast, Clover, Aloha, Lightspeed (U-Series), and Square. If your restaurant uses one of these systems, you're good to go.
To get started, fill out the integration form on the Grubhub for Restaurants website or reach out to your POS provider to double-check compatibility. If your POS isn't listed as a Grubhub partner, you may still have options. Middleware solutions like Deliverect, Chowly, Otter, or Olo can often bridge the gap. For restaurants using older or niche systems that lack official support, tools like Parseur can extract order details from Grubhub emails and send them to your POS via webhooks.
Once you've confirmed compatibility, it's time to choose the integration method that aligns with your restaurant's workflow.
Pick an integration method based on your restaurant's needs and technical setup:
Choose the approach that fits your budget, technical capabilities, and operational needs. Each method has its own advantages, so weigh your options carefully.
Once you've confirmed compatibility and chosen your integration method, the next step is securing your API credentials to establish authenticated connections.
After gaining API access approval and completing any required paperwork (like an NDA), head over to the Grubhub Developer Portal to generate your credentials. This is where you'll find the essential details, such as API keys and access tokens, needed to connect your POS system.
Act quickly when generating keys. The link to access your API credentials is temporary and will expire shortly after creation. As highlighted in Grubtech's documentation:
"Be sure to copy and securely save the key immediately, as the link to access it is temporary and will expire"
. To avoid complications, store these credentials in a secure password manager. If lost, you'll need to request new ones.
If you're using Upserve, you can generate credentials directly through your POS "HQ" Integrations by adding Grubhub as an API partner. Additionally, you'll need your unique Store ID, which is a 7-digit number found at the end of your restaurant's public Grubhub URL.
Grubhub offers four authentication methods:
. The choice depends on your system's configuration and security needs, but Grubhub generally advises using HMAC for most API calls. As noted in the Grubhub Developer Portal:
"HMAC provides a higher level of security by constructing a signature in the request header... We recommend HMAC for most API calls, as it offers robust protection against tampering during transmission"
.
When making standard API requests, you'll need to include specific headers like Authorization and X-GH-PARTNER-KEY. For webhook setup - used for real-time order updates - it's important to note that you cannot configure URLs on your own. According to the Grubhub Developer Portal:
"Partners cannot set up or modify webhook URLs on their own, as we require manual verification to avoid sending requests to unauthorized or incorrect endpoints"
. To complete this process, you'll need assistance from a Grubhub representative. They will help you test and verify your webhook endpoint. Make sure your endpoint supports HTTPS and processes JSON events with the proper authentication headers.
Now that authentication is set up, it’s time to sync your restaurant's menu and pricing details with Grubhub. This step ensures your online menu reflects what’s in your POS, and that orders are sent directly to your kitchen without delays.
Organize your menu data in a clear hierarchy: Menu > Category > Item > Modifier Group > Modifier. Prices should be formatted as integers in US cents - for example, $15.95 should be entered as 1595. This avoids rounding errors and ensures pricing stays consistent across platforms.
Assign unique IDs to every menu item and modifier. When updates are sent, these IDs allow the API to update existing entries or create new ones. For modifiers, use the choice_category_list to group options and set selection rules with min_choice_options and max_choice_options. For instance, you can require customers to select at least one option - like a pizza size.
Here’s a quick breakdown of the main entities and their key attributes:
| Entity Type | Key Attributes to Include |
|---|---|
| Menu | Fulfillment type (delivery/pickup), active hours |
| Category | Name, description, category times |
| Item | ID, name, description, price (in cents), image URL |
| Modifier Group | Selection limits (min/max), group name |
| Modifier | ID, name, price change, availability status |
Once your API is live, avoid manual edits in the Grubhub portal to prevent data conflicts. Instead, push updates exclusively from your POS. Menu updates should process within 30 seconds, while price or availability changes should reflect within 5 seconds. For frequent price changes, use the "Update Prices in Bulk" endpoint to modify multiple items at once.
If an item sells out, use the Update Item Availability endpoint to mark it unavailable in real time. This notifies Grubhub immediately, preventing orders for out-of-stock items. To maintain a strong platform standing, aim for a 98% order acceptance-to-submitted ratio.
With your menu and pricing in sync, the next step is to ensure orders flow smoothly into your POS in real time.
Real-time syncing can be achieved through webhooks (preferred) or API polling. Webhooks push order data to your POS as soon as a customer places an order, minimizing delays.
Before a customer completes their checkout, Grubhub sends a POS_VALIDATION webhook to your system. Your POS then verifies the cart against current inventory and pricing, responding with either POS_VALIDATED or POS_VALIDATION_REJECTED. This ensures customers can’t order items that are unavailable or incorrectly priced.
New orders come in with a RESTAURANT_CONFIRMABLE status. Once your POS receives the order, update its status to CONFIRMED. Many systems offer an "Auto-accept" feature, which sends orders directly to the kitchen without staff intervention. However, if an order isn’t manually accepted within 20 minutes, it will be automatically canceled.
Your POS acts as the central source of truth for menu data. Any changes in your POS - like marking items as out-of-stock - are synced to Grubhub within about 10 minutes. As Erik Collins, Director of Marketing Technology at Del Taco, explains:
"Grubhub's direct-to-POS integration with Aloha makes it possible for us to deliver a better guest experience through increased accuracy, efficiency and speed".
To avoid synchronization errors, don’t use special characters like #, ", &, <, or > in item names. Additionally, configure your POS to handle the is_managed_delivery flag, which provides instant access to driver contact and arrival details.
Once your API integration and data synchronization are in place, the next step is to ensure everything runs smoothly before going live. This means testing the entire system, from order flow to payment processing, and making sure your menus stay in sync.
Begin by setting up a sandbox environment in the Grubhub portal. Select your project, go to the "Sandbox" menu, and input a valid email, location details, and POS store IDs. Allow at least five minutes for the sandbox to activate before placing your first test order.
Use various tools to simulate and monitor operations:
During testing, focus on functionality, API schema consistency (using tools like Postman or Pact), and system resilience - this includes handling timeouts and duplicate requests. For refund workflows, use the Refund Update Webhook. To ensure your system can handle peak traffic, run performance tests with tools like JMeter or k6.
As Rupesh Garg, Founder and Principal Architect at Frugal Testing, points out:
"Payment integration testing is critical to reliable restaurant delivery operations".
Once sandbox testing is successful, request production credentials. Train your staff to handle integrated orders, including using the "Pause" feature during busy times and coordinating driver pickups . After everything checks out in the sandbox, transition to live production and keep a close eye on performance.
After launch, maintaining system reliability is key. Use the Grubhub Merchant Portal to monitor critical metrics like throughput, latency, response time, and transaction success rates. This dashboard provides real-time insights into orders, payments, settlements, and refunds. Keep an eye on operational metrics like order accuracy, refund rates, and menu synchronization errors to spot and address issues early.
Automate tasks like settlement reports and anomaly detection to minimize manual effort.
If you're juggling multiple delivery platforms, tools like Bytes AI can simplify things. This platform consolidates orders from different channels into a single dashboard, making reporting and menu management easier.
For real-time updates, rely on event-driven webhooks instead of polling . Regularly review your financial reports using the "Online Order Integrated" tender type filter to match Grubhub deposits with fulfilled orders. This ensures your financial tracking stays accurate and up to date.
Integrating Grubhub's API with your POS can simplify online order management by cutting out manual data entry, ensuring real-time menu updates, and reducing order errors. By following five key steps - registering for API access, checking compatibility, setting up authentication, syncing menus, and conducting thorough testing - you enable your team to focus more on preparing great food rather than juggling devices.
This integration isn’t just about smoother operations - it’s a smart move in a market where food delivery now accounts for nearly 40% of restaurant revenue. With access to Grubhub’s 33 million users, you can consolidate all sales data into one system, making inventory tracking and financial reporting far easier.
For those managing multiple delivery platforms, tools like Bytes AI can streamline the process further by combining orders from various channels into a single, easy-to-use dashboard. This reduces complexity and helps keep operations running smoothly.
Additionally, nearly 90% of restaurant owners report that Grubhub offers strong ROI. By reducing operational stress, you can also help cut down on the $5,864 average cost of replacing an employee. With proper integration, you’re setting the stage for growth in today’s digital-first restaurant landscape, ensuring each step - from authentication to syncing - supports your long-term success.
Grubhub's API approval process typically takes 14 to 21 business days. Be sure to factor this timeline into your integration planning to avoid delays.
Your POS system should double-check critical information before proceeding with checkout to avoid any hiccups during order processing:
RESTAURANT_CONFIRMABLE.To keep your Grubhub API and POS system in harmony, it's crucial to manage your menu updates from a single, central point. Before integrating the two systems, take the time to organize and finalize your menu setup. Once connected, make it a habit to regularly cross-check menu items in both systems to ensure everything matches.
Leveraging integration with real-time updates can significantly reduce manual errors and discrepancies. This approach simplifies operations and helps avoid the headaches caused by mismatched menus.