Restaurant Technology
Published February 23, 2026
How POS integration syncs menus, prices, and inventory in real time to cut manual work, prevent menu drift, and keep all channels accurate.

POS integration connects your restaurant's POS system with digital menu platforms, ensuring automatic updates across all channels. Changes like price adjustments, item availability, or descriptions instantly reflect on TV menu boards, mobile apps, and online ordering systems. Without this, mismatched menus can frustrate customers and waste staff time on manual updates.
Key takeaways:
To set up, ensure your POS supports APIs, webhooks, and real-time syncing. Also, check compatibility with your digital menu software for smooth integration. Testing and monitoring are crucial to avoid delays or errors in updates. This system is essential for modern restaurants, with 41% of sales now coming from online orders.
Syncing your POS system with digital menus can save you time while transforming how your restaurant operates. This integration boosts efficiency behind the scenes and enhances the customer experience at the front.
When your menus update automatically, your team no longer has to juggle multiple platforms or dashboards for every change. A single update in your POS reflects instantly across all channels, eliminating the need for manual adjustments. This is particularly important since 57% of restaurant operators cite issues with manual order entry as a significant challenge. By automating these updates, staff can shift their focus to food prep and customer service, which helps reduce stress and burnout. And when your team is less stressed, they’re better equipped to deliver great customer interactions.
"When the POS and ordering don't match, guests notice, and your team pays for it." - Appetier
Customers hate ordering something only to find out it’s unavailable. Real-time synchronization solves this by instantly removing sold-out items from all ordering platforms as soon as your POS is updated. Plus, consistent pricing across your website, delivery apps, and even QR code menus ensures there are no surprises at checkout . This consistency builds trust and avoids unnecessary confusion or disputes.
On top of operational and customer perks, synchronized systems give you a clear view of sales trends and inventory levels across all platforms. Instead of pulling data from multiple sources, you get a unified dashboard showing top-selling items, peak hours, and inventory changes. Considering 41% of total restaurant sales come from online orders and restaurants with integrated systems see a 30% revenue boost on average, this centralized data helps you make smarter calls on staffing, purchasing, and menu updates.
Before connecting your POS system to digital menus, it's crucial to verify specific technical requirements. Modern POS systems are generally equipped for real-time integration, but double-check your system's capabilities to avoid any hiccups.
For smooth, real-time updates, your POS system must meet certain criteria. The system should support RESTful API requests to share menu data with digital platforms. Most POS systems organize data in a structured hierarchy, including menus, menu groups (categories), items, and modifiers. For instance, Toast advises using their V3 API instead of V2 for ordering partners to ensure full functionality.
One of the most critical features is webhook capability. Webhooks allow your POS to send instant notifications (such as menus_updated or stock events) to your digital menu software whenever changes are made. Without webhooks, updates rely on polling, which checks for changes periodically (every 1 to 5 minutes) instead of instantly. Additionally, your POS should support up to three levels of nested modifiers for detailed customizations like "Add Bacon > Type > Crispy".
For multi-location restaurants, it's essential that your POS uses unique identifiers, such as GUIDs or multiLocationId, to track menu items across different locations. If you're unsure about compatibility, tools like Bytes AI can help verify whether your POS system integrates seamlessly.
To connect your POS to digital menu software, you'll need specific API credentials. Start by checking your POS management portal under "Integrations" or "Developer" sections for API access. If you can't locate it, contact your Customer Success Manager or sales representative to request access.
Most integrations require authentication tokens (like API Keys, Bearer tokens, or JWT) and OAuth2 credentials (Client IDs and Client Secrets). You'll also need identifiers such as your Corporate ID, Venue ID, or Restaurant GUID. For example, NCR Aloha users must provide a HASP key, which can be found in the Aloha manager application or on the license sticker on the back of your POS server terminal.
Make sure the necessary API scopes are enabled. These define permission levels, such as menus:read, stock:read, or orders:write, which control what data your integration can access. You'll also need to provide a webhook URL from your digital menu software, so your POS knows where to send updates. If you're using OAuth2, ensure your integration can refresh access tokens automatically to prevent interruptions when tokens expire.
Once you've secured POS access, confirm that your digital menu software is ready to handle real-time updates.
Your digital menu platform must be equipped to handle real-time updates efficiently. It should support instant push notifications via webhooks and have a fallback polling mechanism that checks for updates every 30 minutes if needed.
Look for features like automated 86'ing, which uses a Stock API or webhook to immediately remove out-of-stock items across all ordering channels. The software should also be able to interpret "Availability" objects from your POS to switch menus (e.g., breakfast to lunch) based on the time of day. For restaurant groups, ensure the platform can manage multiLocationId values, allowing for global menu templates with local adjustments for prices or items.
Advanced tools like drift detection and real-time alerts can notify you if your digital menu and POS data fall out of sync. Some platforms even offer two-way sync capabilities, which send digital orders directly to your kitchen POS, eliminating the need for extra tablets.
After confirming these requirements, you can move on to the step-by-step integration guide.
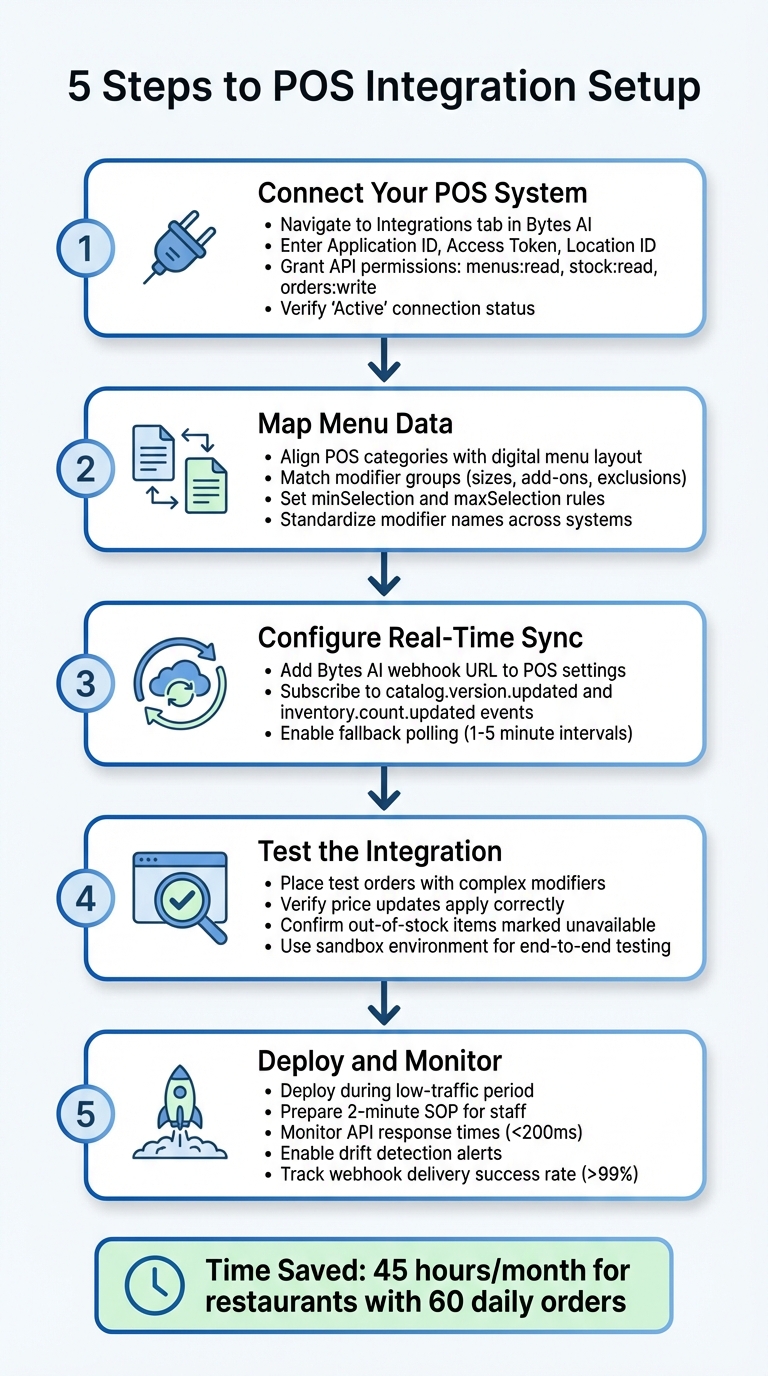
5-Step POS Integration Setup Process for Restaurant Menu Synchronization
Once you've confirmed your system meets the necessary technical requirements, you're ready to integrate your POS system with digital menus using Bytes AI. Follow these steps to ensure a smooth setup.
Log in to Bytes AI and navigate to the Integrations tab. From there, select your POS system from the list of supported providers. Enter the required credentials, including your Application ID, Access Token, and Location ID.
For systems using OAuth2, grant Bytes AI the necessary API permissions: menus:read, stock:read, and optionally orders:write. Once the authorization process is complete, your dashboard should show the connection status as "Active."
With the connection established, the next step is to map your menu data.
Once your POS is connected, Bytes AI will import your menu structure. You'll need to align the categories, items, and modifiers from your POS system with the layout of your digital menu. For instance, if your POS has a category labeled "Starters", match it to the equivalent section in your digital menu using the correct category identifier.
Take special care with modifier groups, which include options like sizes, add-ons, or exclusions (e.g., "No Onions"). Set rules for these groups, such as minSelection and maxSelection (e.g., "Choose 1 size" or "Add up to 3 toppings"). To avoid confusion or errors, ensure modifier names are consistent across both systems and use standardized terms.
After mapping your menu, you’ll configure real-time synchronization settings.
Locate the Bytes AI webhook URL in your dashboard and add it to your POS settings. Subscribe to key events like catalog.version.updated and inventory.count.updated so your digital menu gets instant updates whenever changes occur.
If your POS doesn't support webhooks, enable fallback polling instead. Set the polling interval to between 1 and 5 minutes to ensure updates are captured.
With sync settings in place, it's time to test the integration for accuracy.
Before launching, conduct thorough testing across all menu categories. Place test orders for items with complex modifiers, such as half-and-half pizzas or burgers with multiple customizations, to confirm they appear correctly on Kitchen Display System tickets. Check that price updates are applied correctly and that out-of-stock items are marked as unavailable (using either webhooks or polling).
For a complete end-to-end test, use a sandbox environment to simulate the flow from digital menu to kitchen without disrupting live operations.
After successful testing, deploy the integration during a low-traffic period. This allows you to quickly resolve any mapping issues that may arise. Prepare a simple two-minute Standard Operating Procedure (SOP) for staff to address potential order failures. For example, the SOP might include steps like checking the dashboard for errors and manually entering the order for later reconciliation.
Leverage Bytes AI's monitoring tools to track the integration's performance. A well-functioning setup should maintain API response times under 200ms and a webhook delivery success rate above 99%. Enable drift detection alerts to immediately identify any synchronization issues between your POS and digital menu.
For restaurants processing around 60 orders daily, this integration can save approximately 45 hours of labor each month by eliminating the 60–120 seconds typically spent on manual order entry.
Even after deploying your system successfully, you might run into synchronization hiccups between your POS and digital menu. Here are some common problems and practical solutions to address them.
If your menu updates aren't showing up on the digital menu right away, start by checking that webhooks are enabled. Make sure the "menus_updated" event is active and every item has an "Online Name" to ensure proper syncing.
For added reliability, configure polling to check the /metadata endpoint every 30 minutes. This helps identify stale menu data. If the delay continues, use the "Sync Now" or "Reset Menu" options in your Bytes AI dashboard to manually refresh the system.
Visibility settings can also hold things up. Double-check that the "Show Online" or "Show on POS" options are selected for all relevant items in your POS inventory.
Lastly, review your menu mapping to catch any lingering errors.
Once you've addressed update delays, focus on any mapping issues that might disrupt synchronization. Start by reviewing the "Menu Processing Status" logs or drift alerts in your integration dashboard to pinpoint sync failures.
If an item is incorrectly mapped, search for its POS Name or ID in the mapping tool and manually save the correct match. For modifiers like size or flavor that alter the main item, configure them to "Replace Main" on the ticket. Add-ons should be set as "Additional Items" so they print on a separate line.
If a required item isn't in the mapping tool, add it to your POS first. Then, click the "Refresh" or "Synchronize Menus" button in Bytes AI to pull the updated data. For persistent issues, make a small edit to the item in your POS and republish it. This forces the system to regenerate the menu JSON.
Managing multiple locations introduces extra complexity, especially with location identifiers and potential menu drift. To streamline this process, ensure that each location's "Venue ID" or "Location ID" is correctly tied to its menu branch.
Enable drift alerts to quickly catch mismatches between a location's menu and the central database. A hybrid sync strategy - combining real-time webhooks with a backup polling mechanism that checks the /metadata endpoint every 1 to 5 minutes - can help minimize missed updates.
Additionally, assign unique identifiers (like GUIDs or vendorEntityIds) to every menu item, category, and modifier. This prevents data conflicts across locations. Keep in mind that syncing menus across multiple locations can take up to 15 minutes to fully update across all channels.
For quick troubleshooting, refer to the table below:
| Issue | Likely Cause | Recommended Action |
|---|---|---|
| Delayed Updates | Disabled or missed webhooks | Enable webhooks and set up a 30-minute polling backup |
| Missing Items | Visibility flags or missing names | Check "Show Online" boxes and ensure "Online Names" are filled |
| Stale Data | Sync processing failure | Use "Sync Now" or "Reset Menu" in the integration dashboard |
| Menu Drift | Multi-location configuration errors | Use centralized governance with automated drift detection alerts |
Integrating your POS system with digital menus simplifies restaurant operations and creates a seamless workflow. Instead of juggling separate systems for the kitchen and online orders, you can synchronize every menu update, price adjustment, and inventory change across all platforms automatically.
For restaurants handling 60 online orders a day, this integration can save around 1.5 hours of staff time daily by cutting out manual entry tasks. With 57% of restaurants identifying inaccuracies and inefficiencies as their biggest challenges with manual entry, and 41% of sales now coming from online channels, automation is no longer optional - it’s a necessity.
Several POS systems offer real-time menu syncing to streamline operations. These include NCR ALOHA, PAR BRINK POS, Toast, Lightspeed, CBS Northstar, Lavu, Doshii, Comtrex, NCR, Micros, Micros Simphony, Dinerware, Focus POS, and Pixelpoint-Zuppler, among others. With these integrations, you can update your menu effortlessly, ensuring accuracy and consistency across all platforms.
To maintain real-time accuracy, make sure to sync these key details across all platforms:
This approach ensures your digital menus stay consistent and up-to-date everywhere.
To keep your menus running smoothly during peak hours, make sure your POS menu updates are saved and published. Regularly schedule syncs or run manual updates to ensure your digital menus reflect the latest changes. Keep an eye on webhook health and use retry mechanisms to catch any missed updates. Lastly, a stable network connection is crucial for managing high data loads and avoiding disruptions during busy periods.